
You’re new to WordPress and want to learn how to use the WordPress block editor? You’re already using WordPress, the “old way”, and want to switch to a modern block-based theme that uses the block editor? Wherever you might be in your WordPress journey this guide will help you get started quickly and give you the required know-how to effectively use the block editor.
In this article, we’re going to explain what a block editor is and then walk you through the block editor interface, block editing features, best practices, using block patterns, and more.
Ready? Let’s get it started.
What is the WordPress Block Editor?
The WordPress block editor is the default page and post editor since WordPress version 5.0 has been released in December 2018. It replaced the old “classic” editor and introduced a completely new user interface that opened a whole new world of possibilities not available before.
The biggest difference between the WordPress block editor (sometimes referred to as “Gutenberg Editor”) and the previous WordPress editor (now called the “classic editor”) is a new block-based approach to creating content.
The new WordPress block editor offers an array of blocks that can be used to create media-rich pages and posts. You can add blocks for paragraphs, images, headings, lists, videos, galleries, and more. WordPress has blocks for all common content elements, and more can be added with WordPress plugins.
You can control the layout of the blocks, move blocks up and down, edit them and create visually appealing page layouts from scratch. While the “classic” editor essentially only had text editing features, the new block editor is a fully-fledged page-building tool.
WordPress Block Editor Interface
So, let’s dive into the nitty-gritty of the block editor.
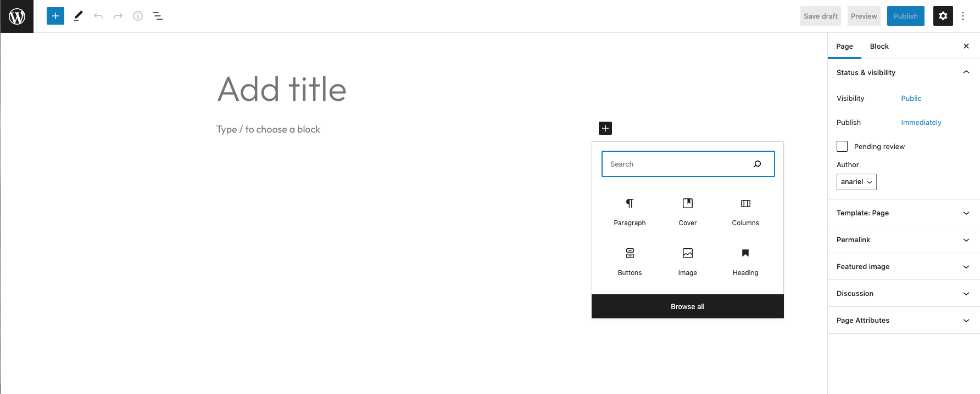
To launch the WordPress Block Editor, from your WordPress dashboard, open a new page or a post.

The WordPress block editor workspace has three main sections:
- Top toolbar
- Sidebar with the post/page settings and the block settings
- Content area
The Top Toolbar
The top toolbar can be viewed as two separate sections, left and right. Both sections feature a few clickable icons, links, and buttons as shown in the screenshot below. Let’s see what each of them does.
1. Left Toolbar Section
Going from left to right we have:
Exit the Editor: Click to exit the editor. It shows the W icon by default, or the Site Icon if available. This will prompt you to save the changes or leave the post or page.
Block Inserter: When you click on it, it will open a tab with all available blocks and patterns you can add to your content.
Tools: Switch between edit and select tools. Choose the Select tool (or press the Escape key on your keyboard) to select individual blocks. Once a block is selected, press the Enter key on your keyboard to return to editing.
Undo and Redo: Undo an action, or redo an undone action.
Details: Get the post/page details including the character and word count, the number of paragraphs and blocks on the post/page, and the document outline showing the headings and how they are structured on the post/page.
List View: view a list of all of the blocks on the current post/page and easily navigate between them.
List View is a very helpful tool to help you navigate between layers of content and nested blocks. Once opened it will remain open as you navigate through your content until you click on it again.
You can select a block you want to customize but also reorder blocks directly from the List View using drag and drop.
2. Right Toolbar Section
Before you publish your post or page, you will see the following options in the section of the top toolbar:
- Save draft: Save a draft of your post or page without publishing it.
- Preview: View how your post/page looks on your site.
- Publish: Make your post/page available publicly.
After you publish your post or page these will change and you’ll see the following options:
- Switch to draft: Unpublish a post or page, making it a draft.
- Preview: See how your post/page looks on your site.
- Update: Save the changes to your post/page.
Settings: Show or hide the post/page sidebar and block settings.
Options: Opens a tab with more options.
Here, you can customize your editing experience as shown on the screenshot.
View
Here you can customize your viewing experience while editing. With enabled “Top toolbar,” all bock toolbars are pinned to the top of the WordPress block editor (right under the top toolbar) instead of appearing directly above the block. “Fullscreen mode” removes everything from view except the Top Toolbar and the “Spotlight mode” highlights the currently selected block.
Editor
By default, you will be in the Visual editor. Switch to the Code editor to view the entire post or page in HTML code editor.
Tools
Here, you can manage reusable blocks, learn keyboard shortcuts, visit the WordPress block editor welcome guide, copy all content on the post/page, or view additional support articles.
Preferences
From the Preferences menu you can:
- Customize the editing experience.
- Change how you interact with blocks and which blocks appear when searching for a block.
- Show or hide individual panels from the post/page settings.
How to Use WordPress Editor Blocks?
Every bit of content in the WordPress Block Editor is a block. Out of the box, there are many available blocks that you can use to add content to your pages and posts. As mentioned before this list can be extended with plugins.
The anatomy of a block
Block consists of a:
- Block Toolbar
- Block Settings Sidebar
- Block Content
By default, the Block Toolbar will appear above the block as soon as the block is selected. Options in the Block Toolbar will vary based on the block you are currently editing.
If you don’t like how the Block Toolbar “floats” above a block, there is a block setting that lets you pin it below the top toolbar:
Every block also comes with its own set of editing options in the Block Settings sidebar. These settings will appear automatically when a new block is added but you can easily switch between the “Page” and “Block” option tabs from the top of the sidebar.
How to add blocks?
To add a new block, click the ‘+’ icon in the top toolbar or click the plus icon in the content area. Once you click the ‘+’ icon, a new panel will open and list all the available blocks. You can use the search field to look for a specific block or select a block from the list. To insert a block just click on the block you want to add.
Once you added the block you can start editing it. Use a Block Toolbar and Block Settings Sidebar to access available editing options.
Once you start learning the names of the common blocks that you need to use, there’s a quicker way to insert blocks using only your keyboard.
If you hit Enter to start a new paragraph block, you can quick-insert a block by typing a forward slash “ / “, followed by the name of the block that you want to insert.
As you start typing, you’ll see a list of all the blocks that match your query. You can then use your keyboard arrows to navigate the blocks and hit Enter to select the block you want to insert.
How to Add Blocks Within Nested Blocks?
This is very useful and can come in handy when creating different parts of your website. For example; you want to have three-column content on solid color background. This is possible by adding blocks within blocks that allow nesting such as Group block, Row block, or Stack block.
You’ll want to add the group block first. Click the ‘+’ icon in the top toolbar and search for the group block.
Click on the block to add it. Click the Align option in the Block Toolbar and select Full Width
In the Block Settings Sidebar choose the Background Color.
Now you’ll add a columns block by clicking on the ‘+’ icon.
Search for the Columns block and click to add it.
Choose the column variation you want to have. In this case, we selected the standard three-column layout.
Three-column layout is now applied and you can start adding blocks to each column by clicking on the ‘+’ icon.
The end result will be your content displayed in three columns on color background.
This is just one example of how you can add blocks within blocks to create appealing content variations for your website.
Tip: with nested blocks, it is sometimes tricky to select the whole group or one of the blocks within the hierarchy. To do that more easily open the List View from the Top Toolbar and select the block/group from there.
How to move blocks?
There are three different ways to move or change the position of a block:
- Using the move handles
- Using drag & drop
- Using the Move to option in the Block toolbar (under the “more options” three-dot menu)
1. Using the move handles
The move handles are the up and down arrows in the Block Toolbar of a selected block.
2. Using the drag & drop
To drag and drop the selected block to a new location within a post or a page, use the six dots icon in the Block toolbar of the selected block.
Click and hold the dots, then drag the block to a new location. The blue line shows where the block will be placed when you release the left mouse button.
You can also use List View and rearrange your blocks using drag and drop from there.
3. Using the “Move To” option in the block toolbar
The Move to option can be found by selecting a block and clicking the three-dot menu in the block toolbar.
On selecting the Move to option, the blue line will appear inside your content. You can then use the arrows to move the line up and down to where you want the selected content to be moved. When you found the position press Enter (Return) key on your keyboard to move the block.
Organizing Blocks in Groups
If you already added blocks and you want to group them, you can select multiple blocks by clicking on each of them while pressing the SHIFT key on your keyboard. Once you selected the blocks you want, click on the three dots menu and choose Group.
Now you can do edits, such as changing alignment, spacing & colors, for the entire block group.
How to Copy a Block?
You can copy a block and all its settings in a few simple steps:
- Select a block
- Click the three dots icon on the block’s toolbar
- Select Copy
Once you’ve copied the block, you can paste it to any page or post on your site. Select where you want to paste the block and then use the Ctrl + V (Win), Cmd + V (Mac), or right-click the three dots menu and select Paste.
Adding Links to Block Content
The block editor comes with quite a few blocks that enable you to link content to any URL. The ones that do will feature the link icon in the block toolbar.
Probably the most commonly used block with the link option is the paragraph block. To link a word or a phrase within the paragraph block select the part of the text you want to link and click on the Link option:
In a pop-up window that appears you can add the URL of the page you want to link to and choose to open the page in the new tab when the link is clicked.
With some other blocks, the link option can have some additional settings, but these are all pretty self-explanatory.
Common Blocks in the WordPress Block Editor
Paragraph Block
The Paragraph Block is simply a box for writing your text. It comes with standard formatting options — text alignment, font size, background, text color, drop cap, and more.
When you click in the content area of your block editor the paragraph block is added by default and you can start writing your text.
Heading Block
Use this block to add headings to your content. Once you added the block you’ll be able to choose between headings (h1, h2, h3…), adjust text and background color, and more.
Image Block
There is a ready-to-use image block in the WordPress block editor. Add the block with the “+” button and then upload an image or select it from the media library.
You can also drag and drop images from your computer, and the editor will automatically create an image block for it.
Once you have added an image, you’ll see the available editing options in the block toolbar as well as in the block settings sidebar.
For example, you can add a Duotone filter to the image:
Adjust image alignment:
Crop the image:
You can also add text over your image, link your image to any URL, and more.
Button Block
Buttons are one of the most common elements on websites. In the block editor, there is a ready-to-use button block. Available options enable you to add URL, text, change colors, alignment, styling, and more. The styling options depend on the WordPress theme you use.
Spacer Block
Spacer block does nothing fancy but it is a great little tool that enables you to adjust the spacing between blocks. It is simple to use; you need to add it like any other block and then use the handle to adjust the space.
Block Patterns
Block Patterns are predefined layouts built with blocks that you can insert into pages or posts and then customize and add your own content. Using Block Patterns can reduce the time required to create content on your site. It is also a great way to learn how different blocks can be combined to produce interesting effects.
The selection of patterns largely depends on the theme you’re using. In a dedicated modern block theme like Basti or Bricksy Pro you’ll find many block patterns and even page patterns that enable you to create the layout for the whole page with one click.
Theme block and page patterns are already professionally designed, as you can see in theme demos, but you can easily customize and adjust them to your liking using available editing options.
How to Add a Block Pattern?
- Click the + icon to add a new block.
- Click on the Patterns tab.
- Use the dropdown category selection to choose which category of patterns you want to use and click Explore to open a modal that allows you to have a larger view of each pattern.
- To add a pattern either click on the pattern you wish to insert or drag and drop the pattern into your content. If you click on the pattern, it will be inserted at the location of your cursor.
Customize a Block Pattern
Once you inserted a Block Pattern, the blocks within it can be edited in the same way as any other blocks explained before. Select a block you want to edit, add your content and then use editing options in the block toolbar and block settings sidebar to customize. You can, of course, add more blocks and Block Patterns to your page at any time and anywhere you want.
Summary
Block editor is a powerful tool that opens up so many possibilities which, in the past, were available only through premium 3rd party plugins. Now in a combination with a modern block WordPress theme, all these options are right there in the WordPress block editor. There is no longer a need to install heavy 3rd party plugins just to create columns or a gallery. To be able to get the most out of the block editor requires a bit of practice and the best way to practice is to play with it. Take this guide as a foundation and then try the available options, build layouts, customize, and soon you’ll be the master of it. Have a great day!